Tuesday, March 29, 2016

Time, what is it good for?

It's all around us but we never have enough of it. Time, the first and most important lesson in bonsai. Some people do talk about time and patience. However, time is the common denominator in all bonsai. Time is the most important ingredient in making a bonsai. Do what we do to speed things up we can not make a plant grow two seasons worth of growth in one season.
  
My wife (I apologize for using you as an example) loves bonsai. If she did not I would have to find another hobby. Whenever we bought plants she would want to pot those plants right away. There would be no growth, no refinement. I understand what she was doing. I am guilty of doing it too. However, I came to realize that by potting plants before they were developed somewhat I was stunting their growth. Now, it would take even longer to have a bonsai with some refinement.


Juniperus californica
California Juniper, It's probably more than a hundred years old
If you want to become a master at anything you have to dedicate time to it. You have to sacrifice countless hours training your muscles and mind to do what you want them to do. There is a dichotomy with bonsai. A bonsai has to be worked on and manipulated. There is pruning, wiring, and fertilizing. We have to apply our time to develop the tree. Then there's the part where you give the tree time to grow. The tree has to grow new branches, new leaves, and more roots. That part also takes time. Not doing anything and letting the plant just grow might be the hardest thing for a neophyte bonsaiphile. Although, some trees don't need as much time as others. Then there is the time of rest. That time there is no growth.


I submit to you that the only way to master time is to subjugate to it. In other words, understand that time is not something that we can control. We can not rush time. We can not make a tree grow faster than it does. When we accept that, then and only then can we begin to develop all the other skills needed for growing bonsai.

I was once asked how a trunk could be thickened. The short answer is time. Cheers.   

Monday, March 28, 2016

Yamadori, Bonsai in nature

When you start learning about bonsai you start to come across the word yamadori. Although I have not confirmed the literal translation many have said that it means collected from the mountains. There is a kind of mystique about wild collected bonsai trees. It is a  throwback to the golden age of Japanese bonsai. I can picture people climbing cliffs to extract a prized tree to sell to some feudal lord.  

I was hiking through Joshua Tree National Park when I came across a wash that cut through some boulders. Off in the distance I saw pinyon pine. I got closer to take a picture. I started to go around a boulder for a better shot when I saw the most amazing thing. I saw a two and a half foot pinyon pine growing out of a crack in the rocks. It had dead wood, it had great taper, it had lots of needles. I was awe stricken.  

joshua tree national park


joshua tree national park
My backpack for scale

What is yamadori really? It  is a tree that has not had enough water, or nutrients, or grew to high of an elevation to develop properly. Some have had animals gnaw on it.  Some have had weather maim it. I Believe that you can replicate all of this at home. Take a moderately sized woody plant. Grab a baseball bat (or cricket paddle) and take two good swings at the plant. Let grow for two years and swing at it one more time. Let grow for two more years than harvest. Then you can have a plant that will be uber hard to work with just like yamadori. In fact I believe some people grow trees  in the ground and let the wildlife forage  and walk amongst the trees. They harvest the trees and sell them as yamadori. I am not criticizing, More power to them. The greatest benefit to buying yamadori I think is to work on a big size tree that is a slow grower. 

Yet, like i said earlier there's a feeling of something special about yamadori. To collect a wild grown tree. Then help it survive, then help it thrive. That is very special. Maybe it is not the tree itself but the work that goes into the tree that is special. I would love to hear your ideas about yamadori. Cheers.

Update 04/22
In this video Walter pall talks about yamadori bonsai and shaping them.

Friday, March 25, 2016

The Novice’s Wife


The Novice’s Wife
When I met my husband, he struck me as being… peculiar but in a good way. He read textbooks for fun, took up hobbies that he became almost obsessively dedicated to (arrow making, bead work, leather work, stargazing, etc), and enjoyed talking about all of the new things that he had discovered about these hobbies. I love to listen to his discoveries though not always with the devotion that is needed.
Sometime ago (the running theme is that I am terrible with dates and details), so, some time ago a kind coworker and firend gave my husband a juniper. A bonsai. My husband came home so excited, he stared at it, pondered its shape, and I knew immediately, we were on the cusp of a new hobby/adventure.
He trimmed the little tree, gave it a shape more pleasing to his eye, began watching seemingly endless videos on bonsai, reading articles about the art and history… next thing you know, one tree was not enough. Our backyard suddenly had an increasing number of seedlings and pine trees (this was in January when all of the Christmas pine trees were on sale - hey I recalled a detail!), and cuttings. Cuttings from trees he found at work, on his way home from work, on his way to the car from a store, so many cuttings.
We had a new baby at the time; she was around four months when the bonsai obsession began. So as a new mom, I tried to support my husband and participate but I was sleepy and tired. While I bought a tree here and there with him, he and the bonsai hobby soon left me behind. A year later, I am still sleepy and tired and find it hard to join him in his enthusiasm for bonsai but I love that he loves bonsai. I love that he can channel his energies into such a beautiful art. I love his sketches and plans for a nursery. I absolutely love seeing him and our girls wander nurseries for that one tree with the perfect trunk or leaves or who knows what else. Those are memories I cherish and know our girls will as well. I love reading his blog, which I need to do more often. I love his Instagram account (he had sworn to never have a social media account) and seeing the world through his eyes, if only a snapshot at a time.
My efforts at supporting the bonsai hobby:
I try to keep my own orchid garden, at least we are outdoors together. This was taken in DC at the arboretum.  

I’ve also made bonsai themed  items such a felt phone case which he wore out very quickly.


When I met my husband, he was a hermit who seldom put the Xbox controller down or left his home (other than for rugby or outings with Little Fat Fat). Now, we enjoy days out in the sun, touring gardens, exploring new places. Being the bonsai novice’s wife is an adventure.
I can’t say Cheers because all I can think of is the classic TV show, so I’ll say thanks for reading. 

- edited because of reddit trolls.

Wednesday, March 23, 2016

Bonsai soil medium, a plethora of choices

I promised and now I have delivered. the soil water retention test. Guess what, I was surprised by one test subject. Bonsai soil theory (lol) is a very controvertial topic (see: http://bonsai-misadventures.blogspot.com/2016/03/bonsai-soil-mix-or-how-to-get-black-eye.html). With this test I will try to support some of the ideas from my earlier posts. This is the first time that I actually try to measure what soils retain the most moisture.  

For this extremely scientific test (Mrs. Takumi my high school chemistry teacher would be proud) I placed the medium in two inch by two inch pots. Starting from the left to the right I used fine sand, Turface, bark used for potting orchids, black volcanic sand, and potting compost.


Sand, Turface, Bark, Volcanic sand, Compost respectively
For each soil type I applied two ounces of water with this basting syringe.


2oz of water
I placed the pot over a plastic cup. The I gently squeezed the water at the same time trying to get everything wet. I did the same to all of the pots.


These were the results. The least water that was retained was by the bark. It retained a little over half an ounce of water. This was almost half of that retained by the other substrates. I was very surprised by that. I thought that water retention would be greater. The most retention was by turface. I thought it was going to retain less water. Turface is a baked clay. Baked clays have micro fissures that hold water. Yet overall it was not much more than sand. I am definitely going to use a lot more turface in my soil mixes. The sand retained a lot of water. This confirms that smaller particles retain more water. Smaller particles create greater surface area. Water cling to the surface, so more water is retained. A problem with sand though is that when wet due to water's molecular properties of attraction the sand becomes compact which is not good for roots. The volcanic rock retained the second least amount of water. It is very porous trapping some water. The composted soil was right in the middle for water retainment.


Results sand and Turface respectively

Turface and bark respectively

Volcanic sand and compost

When mixing soil keep in mind that evaporation rates vary according to substrate.

This final picture is of one part Turface, one part sand, and one part compost. Water retention was right in the middle about one ounce.


Mix

When you mix your soils ask yourselves how much does it rain? How cool/ hot is it. What will be the humidity this year. All those factors and more determine evaporation rate. Where I live it is 80 degrees in the summer with a cool sea breeze. It rains very little and it is slightly humid. I need to retain just enough moisture so that I water my plants once a day. Of course there are many variables when it comes to water retention such as atmospheric pressure, pot size and many other things. I hope this helped though cheers.

If you want to get fancy and learn more look at this https://en.wikipedia.org/wiki/Water_retention_curve


Monday, March 21, 2016

Banyan Style Ficus bonsai from ficus cuttings

Have you ever seen the ficus benjamina trees whose trunks have been braided? After many years the trunks fuse and it literally becomes one tree. This is called inosculation. It happens with trunks, roots, and branches. We can use Inosculation to make a banyan style bonsai.

Banyan trees are trees that start their lives as epiphytes. They grow aerial roots that grow down to the ground. These roots overlap and fuse creating a multilayered trunk. It is a very exotic look. Banyans grow to be immense trees. The branches can grow to be as big as trunks themselves. These branches grow aerial roots that end up supporting these massive branches. I personally love banyan style bonsai.  

Banyan style tree National Bonsai and Penjing Museum
Aerial roots growing from branches

First, you need rooted ficus cuttings. I used Chinese banyan branches. You should use branches of varying size for an aesthetic effect. You must bind the cuttings and leave them for a year. Yes, one year. Oh, by the way, it is going to take about three years to finish this project. It is a long time but the outcome is great. I used zip ties to bind the trunks. When the zip ties started to make marks I would cut them off and tie new ones on a different place. Before wiring, you have to look at all the branches. Try to figure out what branches will go where.


For the lowest branch, I chose the thickest one. As I wired each consecutive branch I would bend them away from the trunk. There will be time for adjusting them after all the branches are wired. One thing to remember is that the tree will look more pleasing if the thicker branches are under the smaller ones. This should be easy to remember as the thicker ones are usually longer than the thinner ones.


Once you have the lower branches it's time to choose the apex. Take a good look at the remaining branches. I tied a new zip tie to the remaining branches. This will help create a tapering trunk, and it will help place the remaining branches above the lower branches. The branch that I chose as the apex I wired and gave it very modest shape. The rest of the branches I bent away from the trunk. I wanted to give the tree some shape so i trimmed the ends. I also trimmed the branches so that the new branches will grow near the trunk.


When I cut the branch tips I cut just above one of the secondary branches. These secondary branches will become the extension of the primary branch and will create taper.


This is what the rough cut looks like. Now it is a question of refining by creating fine ramification.


It will take another year for the fusion to set. As the tree grows the fusion will blend. You will be left with an amazing trunk. Meanwhile, you can treat the banyan like your other tropical bonsai. If you have a west, south, or east facing window you will be able to keep the banyan inside. Cheers.

Update 07/19

The Chinese banyan has grown so much that i had to cut off the ties.  The branches have not fused yet. However, the branches have taken shape. Secondary branches have started to grow. 


 The main branch had the deepest grooves left by the wire. I did not prune this branch at all. That is why the growth was so great.

The growth was so good that the branch managed to pop out a fig. I have never seen that on one of my trees before. 
chinese banyan pre bonsai with fig

I put tow ties on the trunk to secure it. Hopefully, most of the branches start fusing by the end of this year. I rewired some of the branches and put the tree back in its spot.

Update 10/13/2016

A few weeks ago I noticed that the length of the branches was too long for the size of the trunk. So I chopped the tree down to size.

fused chinese banyan


This is the same tree I have been working on this year. Some of the branches have fused. Some other ones not so much. What's interesting is that I started another fused ficus and that tree has completely fused together. The trunks have started growing more branches which I hope will become the secondary branches.

Update 02/04/2017

This is an update on the fusing of ficus microcarpa in general. I have several trees I am fusing. This one seems to be slightly ahead of the curve. I started the fuse in April. The red arrows point the way. click on the pic to see a bigger image.
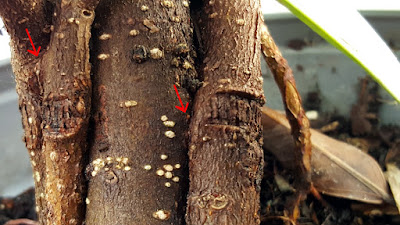
chinese banyan fusing
Fusing ficus microcarpa

Update 02/28/2017

Back to the tree, we have been working on. This is what it is looking like today. I pruned the tree hard. Now it has many fine secondary branches.

work in progress

The tiny little cuttings are starting to fuse. There is a lot of scarring from the zip ties. However, the trunk is small and young. By the end of summer, they will be bu a faint light discoloration. 


It's early February here in LA, that means springtime, means fertilizing will start for the ficus.

April 4, 2016 Update:
Spring is in full swing. It's time to give the tree another haircut.

Before


After


Friday, March 18, 2016

Bonsai, what should they look like (philosophical questions)

My philosophy on bonsai. There seems to be some controversy in the world scene as to what direction bonsai should go. One camp says that bonsai is what came out of japan and that if it does not look like that it is not bonsai. Another camp says that bonsai is living art and that bonsai can change with interpretation.


I have studied art formally. I was born in santa Barbara and have lived most of my life in Los Angeles CA. I have travelled to Argentina, Mexico. I lived in Nashville Tennessee for a few years.I grew up in the 90’s. Why am I sharing all this? My experiences shape how I think. Bonsai is fun and I would never argue with anybody over it. However, I have made up my mind as to where I will take the bonsai that I make.


I believe that if you make bonsai, at least here in the U.S. you are an artist. You are making living sculptures. All the things I learned about art I apply to making bonsai. Therefore, I believe bonsai has to keep evolving. In japan for the most part the elite bonsai makers are shokunin. Loosely translated shokunin is craftsperson. Yet it means more than that. Shokunin is reserved for the most skilled be it bonsai, pottery, etc. A craftsperson is not an artist. A craftsperson usually stays within the parameters of their work and they excell until they become masters. An artist is one who pushes the boundaries, and most important satisfies his perception of art. It is art because an artist says it is. Art is not born from public consensus. Has the artist made good art? That is a personal opinion derived from the person's experiences. Time is the moderator.


I truly believe that bonsai evolving is for the best. If how we shape trees does not change then the art form is dead. Take a look at the many styles of bonsai. Look at the depiction of bonsai in ukiyo-e. Bonsai has been evolving since the chinese brought it to japan. Why should it stagnate now?


The rift in philosophies comes from the naturalistic bonsai. A great many people say that bonsai is the miniaturisation of  trees as they look in the wild. Yet if you look at bonsai today you can honestly say that bonsai do not look like trees in nature. Bonsai are in fact idealized. I have been in nature. Nature is harsh, it will take your life if you are not prepared. Nature is full of life, but it also kills and maims. Only the strongest survive in nature.  And yet, some of that unforgiving quality of nature is added to some bonsai in the form of dead wood, the twisted trunks, and holes that are carved into the trunks. Why? Because that is the diffrence between what makes a good tree from an exceptional tree. The tree has a story to tell. The tree got crushed, it got punished and it survived. Now the tree has a story to tell.    


Mr. Walter Pall makes a distinction between natural bonsai and naturalistic bonsai. He says that to plant a tree in a pot and let it grow is a natural bonsai. To shape the tree to resemble a true wild tree is naturalistic. Naturalistic is still a mimic of the wild. A naturalistic bonsai is shaped and styled. A naturalistic bonsai though does not follow the same conventions of japanese and japanese looking trees.


Humans are part of nature. I strongly dislike when people make a separation. Like ants and bees even like prairie dogs humans have the capability to change their surroundings. Is a beaver dam unnatural? What about a honeycomb or coral reef.  All materials come from nature even plastic. Humans can not make something from nothing. I believe some law of thermodynamics says so.  We do idealize and romanticize things though. We tend to forget the bad and remember mostly the good. All this is reflected on how we make bonsai.


What are we to do? Which side is right and which side is wrong? I believe that the most important thing for the hobbyist is that we receive enjoyment when making bonsai. Does it satisfy the artistic, horticulturist, OCD side in us? Does it bring us joy as well as frustration? Does it fill our souls? That is what is the most important. We cannot say that one style is bonsai and the other is not. Nor can we insist on showing a naturalistic bonsai at a japanese exhibit. There has to be some sort of respect. You do not have to like every kind of bonsai, but you can not say a nursery stock plant potted in a bonsai pot is not a bonsai. Nor can we denigrate the so called cookie cutter styles of japanesque bonsai.    


For some to make a bonsai that is just like classical japanese bonsai is the epitome of beauty. To them I say well done. To some making trees into cutting edge works of art is beauty. To those I say well done. The future of bonsai will come one tree at a time. Only time will be the arbiter of what bonsai is.  

Thursday, March 17, 2016

Japanese green Maple salad

It was a beautiful March morning, the sun was shining, the birds were singing, the plants were growing. I strolled down my garden to check on the seedlings. Those beautiful seedlings. They are full of hope and potential. I looked at the green maples. I saw this:


Do you see what I see? Look closely. Let me show you a close up.


Do you see the nubs?!? There used to be 25 little maples pushing their way up, on their way to becoming amazing bonsai. They were cut down at the Genesis of their lives. And who could the culprit be? Only one piece of evidence could be found. Glistening in the morning light a trail of slime led away from the pot. It was a garden snail. 

Well that's it for this year's green maples. I was very upset, but nothing can bring them back. Time to reassess where I have my other seedlings. Cheers.


Wednesday, March 16, 2016

Azaleas, the T-1000 of bonsai plants

Azaleas are great looking shrubs. Most azaleas have smaller elliptical leaves. They are easy to grow, and they have beautiful flowers. When refined the whole tree will be covered in flowers. One of the great things about azaleas is that they can be kept indoors. Azaleas grow naturally in Asia and North America. The blooms come in almost all colors, and they can look amazingly Delicate. Azaleas themselves are very hardy plants. They like partial sun, acidic soil, and moist conditions. Some azaleas can tolerate cold, but most come from subtropical and tropical places.

I love working with azaleas. They can take a beating and even seem to thrive on abuse. Azaleas can grow new branches from anyplace that has bark. That means you can get new branches on the trunks, and other branches. Many trees can not do that, and that presents a challenge if an important branch dies. Azaleas however, do not respond well to severe root pruning.

When I bought this azalea It was a huge topiary. It measured two feet from the lip of the pot. The trunk was nice and thick. First I thinned it out. I left the branches long, but I left two secondary branches where there were multiple growing from the same place. In August when I saw new growth I hard pruned it. I cut all the branches to five inches from the trunk. The azalea started to grow new branches. By the time of this writing (mid March) I have pruned the azalea two more times to shape and start ramification.    


I placed my hand for perspective


Close up of the trunk

Great bonsais can be made from big box stock. Make sure it has one trunk. This one I left alone for a year. I cut three branches growing from the trunk and gave it some form. You can see the wounds in the picture. They will heal fairly quickly.

Big box store azalea

One thing to keep in mind is that the branches are brittle. You can do some manipulation, but you must be careful. This azaleas is my daughter’s. I was helping bend a branch down. Can you guess which side of the tree I snapped the branch off of? The worst part is that it was the second time I broke a big branch on her azalea.  

Watch out for brittle branches

In Japan the prized azaleas are called satsuki. Satsuki is the word for the month of May. These azaleas bloom in that month. However, there are so many hybrids and varieties that you could fill your collection of bonsai with azalea and you would not repeat yourself. Cheers.

Update October 4

I can not tell you how many times I have pruned this azalea since I posted about it. I'll start by showing you the trunk.


I bought this tree because i really liked the trunk. It was a topiary bush I found at a big box store. I got it after the flowers had fallen off at the end of the season. This is what the plant looks like now.


The primary branches have grown. Next season I will cut it back about one third the size and let the secondary branches grow. 


Monday, March 14, 2016

Leaf reduction and its ramification

Leaf size reduction, let's do this. Leaf reduction comes from fine ramification. That's it, this might be my shortest post yet.

Ramification is when a branch grows, then a secondary branch grows on that, then another branch grow on the secondary branch. A key point is that the growing branch remains smaller than the branch it grew on. The rule is that the finer the branch the finer the leaf size. There are limits to how small the leaf can grow, and not all trees will reduce in leaf size.

Some trees will only grow branches where leaves grow. Some others will grow branches anywhere on trunks and branches. Having said that I have noticed that for some species if I cut the branch short before it is lignified (before the branch becomes woody), the first pair of leaves of the secondary branches will grow very small.

When thever secondary branch gets to a desired thickness prune it shorter than the main branch. Keep doing this with the third and fourth branches. Cut each branch length smaller than the branch it grew from or until you get the desired results. How short should you cut them? Well, People will tell you many things. It depends on what shape your giving the tree, and the branch you are working on. The best thing to do is to do and learn.  

Leaves are solar panels. The tree needs a minimum amount of solar panel surface area to survive. As you reduce the size of the leaves the tree will produce more leaves to compensate. A great example of this is ficus benghalensis. The leaves of this tree are bigger than a human hand. Yet, the size of the leaf can be reduced greatly on a bonsai through ramification.  

Lastly, some people defoliate a tree in the summer. This causes the tree to push out a new flush of leaves out (remember, a tree has a minimum solar panel are requirement). The new leaves grow smaller than the previous set. This is usually done the summer before they exhibit their tree.

Reduced leaf size Chinese elm

This is the same species of tree as in the picture above. The seedling is about three months old and has no ramification. If you notice, the leaves are bigger than the leaves of the bonsai that has branch ramification. Look at the base of the seedlings pot. There are some leaves there that are the same size as the ones on the refined bonsai. I thought that it was interesting to see that. I have a theory that leaves can be reduced to about the same size as the plants first true leaves. Ill have to keep making observations though.

Chinese Elm


Ficus microcarpa at the National Bonsai and Penjing Museum


This was a simplified version of leaf reduction and ramification. The basic principles are there. Cheers.


Thursday, March 10, 2016

Great bonsai book, for beginners and everybody else

Bonsai the Art of Growing and Keeping Miniature Trees buy Peter Chan. This is one of the best books for beginners that I have read. This book covers everything from the history of bonsai all the way to preparing for shows and the international bonsai scene. This is not one of those coffee table books with lots of pictures of bonsai but little information. this is an actual book that can teach you fundamentals that other books don't cover.

Peter Chan talks about Horticultural principles like growing trees from seeds, and even Grafting. he tells you how to do it and how difficult it may be. One of the best chapters was on Art Theory. He says that bonsai are living sculptures. he talks about many artistic Concepts that are applied to bonsai. When I would look up YouTube videos in which bonsai professionals would wire branches. I would wonder what their train of thought was. I would wonder how they made their decisions. In this book Peter Chan explains many fundamentals of bonsai design.

What I'm trying to say is that if this book removes all the mystery of how to make a bonsai. Now I'm not saying that he explains every technical or Horticultural detail butt it is a great book for beginners.

One chapter that I have never seen any other book is on how to judge bonsai in a show. He breaks down the different parts of judging and how many points should be awarded. All the mystery is gone.

If I had read this book when I started making bonsai trees I would have avoided much confusion. I had the desire to make Bonsai but not the knowledge and watching YouTube videos was not enough. There are a great many technical books out there for making Bonsai but for the beginner I highly recommend this one. Cheers.

Publisher    Skyhorse Publishing
Publication date    May 6, 2014
Language    English
Product Dimensions    0.5 x 8.2 x 10.5 inches
Shipping Weight    1.9 pounds
Book length    176
ISBN-10    1629141682
ISBN-13    978-1629141688

Tuesday, March 8, 2016

Spring time root pruning time.

Spring time, many plants have laid dormant for winter and now they're ready to emerge. On a past post I have shown you how i cut the tap roots off of seedlings. This post is about removing the tap roots from yearlings. The big difference is that I will not use any rooting hormone nor will I use a sandy middle (see:http://bonsai-misadventures.blogspot.com/2016/02/cedar-of-lebanon-cedrus-libani-cutting.html ) to place the plant in. Why am i cutting the tap roots? Tap roots are anchors. They grow long and deep. This is not good for plants living in pots. So, to promote a radial root pattern we remove tap roots. Important: do not let the roots dry out. Try to cut the roots during a cool time of the day. Have some water handy to dunk or spray the roots.

These are Osage orange. These trees were very prolific in the last ice age. The megafauna would eat the fruits and disperse the seeds. I don't know if any animal eats the fruits anymore. No animals munching on the fruit, no animal planting its seeds all over the place. Osage orange was also an important tree for the inhabitants of of the united states precolumbian arrival. The wood is great for making bows.

Enough about non bonsai related topics. All these Osage orange were planted from seed in the same pot. To start we watered the pot. Then we pulled the plants and soil out of the pot. We massaged the soil softly until it all fell off. Then we untangled the roots. You can probably skip the untangling part. I untangled it so I can take a clearer picture. You can just go right ahead and snip the excess root.


To know where you should cut is easy. Cut an inch to two inches under the soil line. That is under where the plant grew out of the soil.


  Now repot the plants and watch them grow. Cutting the roots is going to slow growth for a short time. The plant has to grow enough root to feed any new growth.  


These osage orange were sown in late spring. I don't believe they reached their full potential for last year.  But this year they’ll get sun, some water, and a little blood meal and they should stretch out.

These Acorns I harvested in early October. I planted them a week later. Three weeks after They were popping out of the dirt. They grew all winter here in sunny southern CA. Now in March they have grown about five inches. The procedures are the same as they are for the Osage Orange. Cut an inch to two inches below the acorn.

 Oak tap roots grow straight down and because they didn't have anywhere to go just started to spin around and they all got tangled.


 Here they are after the roots got chopped.


 The soil mix is 50% organic 50% inorganic, sand turface and fine volcanic rock.


 That's it for this batch of Oaks I have 3 more pots to do.


 This was the longest Oak seedling that I found.
 It measured about two feet.


Cheers 

Update 04/07/2016

I have lost a few of the oak trees. I pruned some cork oak right after and they are doing fine. I believe that i waited much to long to prune the Live oak. All the cork oak were much smaller than the live oak. The live oak that were smaller are doing great.