Friday, December 2, 2016

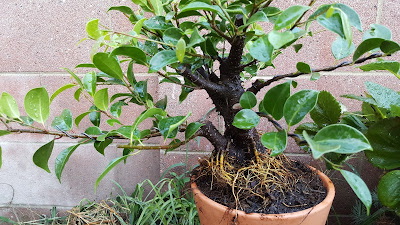
Rosemary bush year end bonsai

bonsai christmas tree


Hello my fellow bonsaiphiles. This is the year end of an experiment that I have conducted with you.  I want to thank you for your comments and emails. I want to thank those who have posted on my blog (Luke, i'm still waiting). This Blog has been therapeutic for me. I have chosen this rosemary disguised as a christmas tree. I understand that people who celebrate christmas around the world are in the minority. However, This is the time when most christian feel an even more overwhelming desire for brotherly love toward all people. That is why I chose this tree at this moment.

Anywho, this rosemari I bought at one of my favorite nurseries. I t was a 2 ½ foot bush. Originally the tree had been growing like this:


Of course it did not have this shape. It was growing up, not to the side. I noticed the twin trunks. At first I was not sure if it would make suitable material. Every Time I looked at it it made me more and more excited.

At first, I tilted the pot and gave it its general outline.Then when it started to grow again I potted it in its current pot. A big problem I had was that all the roots where now on one side of the tree. It looked very awkward.


A few months later after roots had grown along all the soil I removed the tree and sawed off all the roots directly to the left of the trunk line (where the trunk meets the soil). Now I could place the tree in a better spot in the pot.

I spent seven months to get it to this point. It cost $8.00 U.S. and the pot is a used chinese one that I spent $5.00 U.S. on.

When I first started bonsai I had so much trouble seeing a possible bonsai in a bush. I didn't let that stop me though. I made lots of mistakes but I pressed forward. Am I a master? Heck no! I am having fun and learning. Maybe i'll tackle some pine trees next year?!?!?!? Cheers.


Tuesday, October 18, 2016

The scholarly man's tree, Bunjingi style

Bunjingi is a style that flies in the face of conventional popular japanese bonsai aesthetics. The style is very old. This style is a throwback to chinese potted trees. That's that for the history lesson. This post is not really about the style. When I took this cutting I knew that it was going to be bunjingi. It had a long narrow trunk with two very dramatic curves. The problem was how was I going to make this tree look amazing in my eyes.


The tree had started to develop ramification, and it had a basic shape. The tree was looking like it was going to be a chinese type miniature tree. The chinese call their miniature trees penjing. Penjing is not really a style but the chinese word for bonsai. However, the chinese aesthetic value is different from the japanese, so the trees look very unalike.

I was pruning my tree to further develop ramification when my mind's eye saw the bunjingi tree I had been looking for. The best part was that I was going to create this new tree by cutting one branch.


So i took the pruning shears to the main trunk and lopped off the unwanted part. The transformation for now was complete.


I will be starting over with this tree. I have to build ramification and keep shaping the tree, Aesthetically it is a lot closer to done.


The piece I cut off will not go to waste. I potted that piece in bark soil. It will grow roots in a few weeks and I will have the foundations to another future bonsai.


I have said it before, don’t be in a rush to shape, cut, pot, etc your tree. Work on building it up. You will get ideas on what direction to take your tree. cheers.

Friday, September 16, 2016

It's pronounced kəˈtoʊniːˈæstər not Cotton Easter

I saw the most amazing cotoneaster at one of my favorite nurseries yesterday. It had beautiful leaves. The leaves where about just right for the size of the bush. The bush had a few berries hanging on. Yet, The greatest feature was its natural curved trunk. I however, will show you the after shot first. Why? Because I chopped and hacked, and maimed this poor little tree.

What do you think of this tree?
I honestly did not want to. The tree gave no choice, no choice if it wants to become an amazing bonsai. This is what I envision for it.


pruning
This is desired outcome
Now let me show you what I started off with.


I know, it had unbridled branches much like the hair of a free spirited hippie who ignores hygiene and never washes their hair. That was what drew me to it. Beautiful leaves and berries on a large mane. What kept me though was its long and well developed curved body. A tree can never reach its potential if the trunk does not look good. A good trunk and bad branches what do you do? You chop off the branches.  Good branches and bad trunk? You can't chop the trunk. You can correct issues with trunks, but that will take longer than a branch problem in pre bonsai trees.


As you can see I had many choices on how I could shape this tree. Different people will have different viewpoints. You may infact say that my choices are crazy, and you know what? You may be one hundred percent correct. However, I have made the cuts so now it's too late to fix anything.


The two aesthetic principles that i gave the most weight to was first, movement. Second, I wanted a nice taper up the tree. I cut away all the dead stuff, and all the things that obviously I did not want to keep. Those would be smaller low branches, branches growing against the direction of the other branches, very large higher branches.


You can see that with some clean up the picture begins to focus. Every time we do something to the tree it should make in our mind's eye a clearer vision of where the tree will end up. I love cascade and leaning bonsai. I would have loved to have left the main line of the trunk reaching out over the pot, but this would not have made a great bonsai. The main line is moving to the right. I needed to change direction to make it more interesting.


After the cut was made the tree looked even better to me. It was obvious that the direction of the main branch though moving in another direction was still too long and straight, and that my friends is not interesting. I also saw that a few branches i had left on top of the big curve did not look so great. Another challenge was that the top branches were very thick. I needed nice thin branches. I knew i would have to lob them off.


The last thought was of movement. The trunks line will end at the apex. The new apex is the little tiny branch the orange arrow is pointing too. Their is a small problem as the branch the new apex sits on is a little thicker than i would like. That is a problem for next year though.


Did i cut too much. I would say yes. We'll see what happens. Good or bad I will definitely learn something from this tree. Cheers.


Update September 27

Did you know that cotoneaster is in the rose family? I was a little afraid that I had cut off more than I could chew. I would say that I chopped off  95 percent of the foliage. Yet, this resilient plant only 11 days later has given me a rose.

flower
Flower!!!
This is of course, a very good sign. the leaves on the left branch are also new. What an incredible find this tree was.


Update October 24

One month and a week after i pruned this little tree it has pushed out many new branches. I will remove the branches that I do not want. Those include downward and upward facing branches. Also, branches growing to close and in the same direction and others. The new branches I leave will become my primary branches. I will not brune those until probably next August so they can thicken and grow secondary branches.

One month and a week after removing most of the foliage

Top view  shows that the branches are growing in a radial pattern.


Wednesday, August 31, 2016

What Ficus Microcarpa has taught me


I have been working with a lot of ficus microcarpa this year. I have learned a few things (and I realized I have many more things to learn).


I have posted many times before on how resilient ficus microcarpa is. Many times I thought I had killed a tree. All the leaves would drop. It would look so sad. I would set them aside to discard later where i would forget about them. Then I would find them some time later with little green buds pushing their way out of the bark. That's not to say that some have not died all the way (The Princess Bride, anybody?). I have bent trunks to amazing curves. I have potted trees in the smallest of pots, I have pruned all but a few short branches and these trees keep coming back. I have seen pictures of abandoned ficus bonsai which have broken free of the pot and have become full size trees.
Epiphytic Ficus Microcarpa


Something I have noticed about FM is that there is a big difference in pruning green branches versus pruning hardened or lignified branches. Knowing what happens can help in bonsai design. When you cut a green branch it will die back to the node just below the cut. You can cut a foot  from a node it will still die back to the first node under the cut. The benefit to this as I have seen is two part. First, as the branch continues to grow it will heal without a scar. Yes, that type of pruning heals fast and if you remove all the dead tissue it will heal smoothly.  Second, I notice that if you cut the bud while the leaf is still small the leaf will pretty much stay the same size. You can get amazingly small leaves like that.


Cutting bigger lignified branches is a different story. A lignified branch is a branch that has become woody. These branches can bud anywhere along the branch. That means that if you cut it short it will bud somewhere in the vicinity of where you wanted it to bud. You may also get multiple buds. That means more branches, more ramification, and more leaf reduction.

New branches started growing after I cut the original branch

There is some differing opinion on what I am going to say next. Please keep in mind that this is a post about ficus microcarpa. If you leave a branch uncut it will thicken faster than  if you prune and let the new branches grow. Here is an example: I let a new branch grow to cover a bald spot on a tree. I did not prune the branch until it got to a thickness close to the other branches. So far so good. Yet, at the same time I have branches that are six month older. These branches i clip because I am trying to develop fine ramification. If these two branches thickened at the same rate I would have incredibly thick branches with exaggerated taper, which is not the case. An uncut branch will thicken faster than branches that are pruned.

Thinner branches on top are older than the bottom branch that has been wired


A great thing about ficus microcarpa is that they are ready to grow aerial roots. All you need is moisture. Here is what I do. I add ground bark to the pot to the height I want aerial roots to grow. Then I water as usual. In as little as a week you will be able to see aerial root buds. Leave the bark (or sphagnum moss, or anything that will keep the trunk moist) on for as long as you want. I have a tree that grew aerial roots very low on the trunk. Now the tree has buttressing roots. I know in cold climates where you keep ficus indoor in special light and humidity grow containers have a high number of aerial roots because the humidity is so high. I have not grown aerial roots from branches yet. I am devising a plan as i write. I will put moss on said branch and will wrap it with mesh. The mesh will help me regulate humidity through spraying. It might be easier to wrap it with plastic, but why make things easier on me?
Aerial roots
Chinese banyan aerial roots


Ficus microcarpa love fertilizer. Ficus microcarpa want to grow. I have seen growth as little as two days after fertilization. I fertilize at the fertilizers manufacturers recommended full strength. The ficus love it. I fertilize every two weeks. However, some times I have fertilized weekly. I have seen amazing growth. I do not fertilize any cutting until I see a few leaves. I figure if the cutting has leaves it has roots. The more roots the more fertilizer it absorbs the faster it grows.
Before, (March 24)

After, (May 23)

I have taken cuttings of varying sizes from epiphytic ficus microcarpa. Some have been the thickness of a pencil and some 4.5 inches in diameter. I would say that 99.1 percent have survived. I have taken cuttings from a FM tree. I have had 60 percent success with those. I always plant cuttings in bark. Bark retains little water yet keeps things moist. Bark has barely any nutrients, so after the cuttings have rooted I put them in composted soil i buy for two dollars American from the big box store. Even the huge cuttings I have taken I have put in bark.
Large cutting


That is all I can think of for now. If I remember anything else I will add an update. Cheers.

Oh yes, more info here: http://www.bonsaihunk.us/

Wednesday, August 24, 2016

Bonsai, it's the sushi of the horticultural world


I needed a picture for this post, so I chose this

It's time for one of my rants. Subject: Suhi. No, Not really. It's about bonsai. In fact, it is about the evolution of bonsai, and international bonsai.  


A while ago I watched a Begin Japonology episode about sushi. Sushi at first was fermented fish preserved in rice. This was something similar to what had been done in China. Sushi was an import. It slowly changed according to prevailing circumstances. At first sushi was a food only eaten in Japan. Sushi eventually made it to other countries. Some of these countries started making sushi with local ingredients. A good example is the famous California roll. The use of local ingredients has created in some a desire to eat/ learn about “authentic” sushi.


Is this sounding familiar? The parallels to bonsai is very uncanny. One could formulate many reasons as to why this is, but that is a post for a future date.


I was watching NHK last weekend. The subject was sushi. The last segment of the show was about the evolution of sushi in other parts of the world. The consensus was that international varieties of sushi should be encouraged. Sushi should be an inclusive food. Also, that sushi from other parts of the world does not detract from what sushi is in Japan. In japan you can get conveyer belt sushi all the way up to sushi made by Jiro.


You have already talked about what a bonsai should look like before Ivan. I know, I have. However, This is a different perspective. Sushi and bonsai have many similarities. Like any metaphor they are not identical. Yet, it is interesting to see how two distinctly Japanese things that are popular around the world  are perceived by the very people who make them. The differences in how each group embraces the evolution of the two art forms is remarkable. Why is there so much push back from the bonsai people in regards to evolving bonsai design. Why is evolving sushi trends more palatable ;)?

Do we who love bonsai love to argue? There are many points of contention in the world of bonsai. Why is that so?  Are people who are attracted to bonsai by nature grumpy people? I do not think so. If that was the case every bonsai club in the world would be composed of one person. Maybe its that bonsai attracts people who like to make things “perfectly”. These people want to make the best bonsai possible. In their quest for the perfect tree they become very meticulous. Or not. Cheers.    

Friday, August 19, 2016

August repotting of a pre bonsai, the roots are moving to a deluxe apartment in the "sky?"

Here in southern California the heat is on. We just had a heat wave accompanied by a huge forest fire. I live in Los Angeles. This city can get very arid. Since I live close to the Los Angeles International airport I sometimes bump into tourists. One in particular was a very nice man from England. One of his complaints about Los Angeles was that it does not have many green spaces. The reason for this is that los angeles is in fact a desert. We have little rainfall. We have few rivers and streams. If it were not for aqueducts and the great San Francisco earthquake we would have been a small town of little importance.

The fact remains that it can get hot in Los Angeles. Heat is wonderful for growing tropical plants. I potted this ficus cutting in a bonsai pot so the roots could start growing. eight months later and the growth rate has been amazing.


I believe that this is the perfect time to pot this tree in a bigger pot. Some people repot conifers and deciduous trees in August. Some tree species go into a dormant phase during August. I am not convinced that tropical trees go into a dormant phase in August. However, it being a ficus it is very resilient, and to tell you the truth I would repot it any time of the year. It's just that I am doing a lot of repotting this week, so I decided to repot this tree as well.


This specific cutting loves to grow aerial roots. In fact, if you look at this picture you can see that some aerial roots have thickened and now look like buttressing roots.  Humidity in Los angeles is midrange to low. When I water the trees i wet the brick wall, I wet all the ground, and I have a tub under some planks to capture the runoff.  All this increases humidity which means more aerial roots.


I am going to try to keep the root ball intact even when it is time to pot in a bonsai pot. I noticed that this is a technique used in conifers.


More space for the roots means more growth. More growth translates to quicker development, or so the story goes. Cheers.


Wednesday, July 27, 2016

Akadama Vs. Dirt, or whats dirt got to do with it?

I grow my seedling in dirt I get from my local home improvement center. After rooting my cuttings I put them in the same dirt. I use this soil because I know that my plants will grow very well in it. In the bonsai world there is this whole bias against common soil. The worst thing you can put your tree in the mind of bonsai lovers is regular soil.


I remember reading once that a bonsai lover went to an older man's house to buy some bonsai. Apparently the older man had an extensive collection of bonsai. However, the older man was not able to take care of this collection any longer. The trees had fallen into disrepair. Some of the trees had died. The first criticism that the bonsai lover made was that these trees had been potted in regular soil. His thinking was that the soil did damage to the tree. I thought to myself, “that's probably why the trees hung on for as long as they did”.


I will start an experiment. I will grow some seeds in akadama and some in soil. I will also plant some rooted cuttings, and I will use deciduous trees and evergreens. I will also use broad leaved trees and conifers. I will water them and feed them the same amounts.


I do not have anything against baked clays. I use Turface in my soil mixes. Hard baked clays are very porous. They retain a lot of water without making the soil soggy. The clay is hard but can be broken down by roots. Hard clays in my belief are good in bonsai soil mixtures. I do dislike the suggestion that 100 percent akadama is the only soil for bonsai. Heck, if that were true why even plant trees in the ground? The big draw back to Hard baked clays is that they have zero nutrition for the plants. This may not be a big deal as many bonsai trees are on feeding schedules.


Bonsai empire has a page dedicated to the subject of the use of akadama: http://www.bonsaiempire.com/blog/akadama-soil. Here is a little snippet of what the article says.


"(1.) Do you use akadama? If so, for all your trees? And for trees in all stages of development?
Yes, I use akadama for all my trees. I use less akadama on the tree in training (25% or less). - Boonyarat Manakitivipart (Bonsai Boon)
I try to use Akadama for Japanese maples since I have found nothing better. Unfortunately price and unreliability of supply in the USA means that this is not always possible. I also use recycled Akadama as a partial ingredient in general purpose soils. - Colin Lewis
I haven't used Akadama on my own trees for over 10 years now; there have been occasions a client has insisted on using it for deciduous trees (that can be bare-rooted) but I always refuse to repot a coniferous species into Akadama. Pines and Junipers cannot have a complete soil-change to remove Akadama and repotting is infrequent; it stands to reason that any akadama introduced into the soil of a Pine or Juniper will become very compacted before there is an opportunity to remove it. - Harry Harrington
The answer is simple, because I do not use Akadama. Have tried it and it doesn't do its job here. It doesn't fit the growing conditions around here (Northern Europe), it is expensive, and other high quality soils are available at low costs. Denmark is a country with a proud gardening history and a well developed greenhouse tradition, which has contributed with a lot of research and development bringing forward the best soil mixtures for container growing i.e. So why import a soil when very good and tested soils are at hand? - Morten Albek
No, in Indonesia, we only use volcanic lava soil from Indonesia for all of our Bonsai. for all stages. Excellent and cheap! - Robert Steven"
So, just like everything else in bonsai it really is up to the individual. Where you live, and how you grow bonsai determines what you use for soil.

If you keep reading the article you will see that some people vigorously defend akadama, some people will use it if they can get it or not if it is not available, and some people will claim that akadaa can harm your tree. Experiment coming soon. Cheers.

Tuesday, July 19, 2016

Myrtle

Myrtles have beautiful bark, beautiful leaves, and beautiful flowers. Most myrtles come from asia. The popular one in Southern California came from china/ korea.

At the last bonsai meeting it was 2 ½ hours all about Myrtles. It was fantastic. I had not considered this tree for bonsai. Its beauty and fast growth made the myrtle more desirable. I learned that the myrtle is easy to grow from cuttings. As these are abundant trees in my area and they grow many branches from the base of the tree (suckers) it was an easy decision to try my hand at this tree.


I cut these branches friday June 17th. It was about 9:30 in the evening. I had gone to a dinner with my wife and on the way home I picked them up. I could not see where I was cutting it was to dark. I managed to cut some long stems. I placed them in a cup of water. The weather had been hot, so the tips of the branches were a little wilted. The next day in the morning the tips looked a little better.


I placed the cuttings in a bark medium four days after I original cut them. The bark was the kind used for potting orchids. Then we got hit by a heat wave. I thought I was going to lose all the plants. Two of them survived. YAY! It did look like I had lost them all. However, I kept watering the myrtle.  


I am going to go cut some more. Cheers.

Thursday, July 14, 2016

I broke a bonsai, or accidental pruning

Sad news and tragedy. At least for me. This week I received some ficus religiosa cutting from sn3aky352. A thank you very much for the great cuttings. I was very excited to open the package and getting the cuttings in a more comfortable home. I put them in orchid bark medium (That's what I do with all ficus cuttings). I started to water the new ficus cuttings. The other plants looked a bit thirsty, so i started to water them too. I was done watering and started to put the hose away. As I followed the the hose i found that it had crushed one of my bonsai. I was in disbelief. The hose had fell on a lantana. Not any Lantana, a lantana that I was preparing to give as a gift this August.


The Lantana had started to reduce the size of its leaves dramatically. It had a nice shape, and I was getting ready to trim the roots.    


Lantana are very brittle. I consider myself lucky that I didn't split the trunk in half, and that the tree will be able to make a recovery. The funny thing is that the silhouette still looks okay. It's Just that their is a chunk missing.

How can I avoid this problem in the future? I am going to have to restructure my garden. Cheers   

Wednesday, June 22, 2016

Kapok Ceiba Pentandra, separating seedlings and removing tap roots


A few people have been planting kapok seeds. Last year I planted a few. The growth rate of these trees was phenomenal. I forgot exactly when I planted these seeds. It was sometime last month. As you can see the first true leaves are pretty big on some.


silk tree Ceiba pentandra seedling

I soaked the seeds until the water started turning cloudy. I have grown kapok seeds in only water before. I kept them in a little saucer and made sure the water stayed clean, and that the water only came up halfway to the seed. For these seeds pictured below however, I planted straight in a one gallon plastic pot.


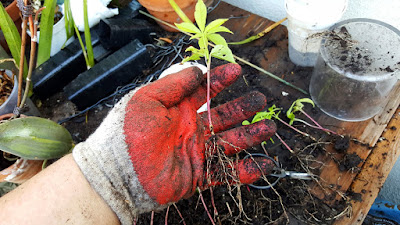
My hand for scale

It is easy to break up the individual plants at this stage. The roots are growing long, but the fine roots have not grown enough to tangle themselves with each other.


ceiba pentandra, silk tree

I prune the roots of my kapok. Why? I do not want a huge tap root. I cut the lengths according to the size of the tree and the amount of fine roots. The longer and the more fine roots the more I cut.


This was one of the bigger seedlings and I cut just above the halfway point of the root.


I potted the plant with a blend of coconut husk, peat moss, and some soil with coarse sand.

ceiba pentandra seedling

The big trunk in front is approximately one year older than the seedlings behind it. Cutting roots stunts development for a time. Yet, you can see that the kapok is an aggressive grower. I have been working on these trees this last year. If you want to see my expiraments check out my other post: http://bonsai-misadventures.blogspot.com/2016/04/kapok-silk-tree-pre-bonsai-experiments.html
Cheers.