Sunday, January 29, 2017

Dead bonsai, new life

As a general rule you  should never give a bonsai as a gift. You do not unless you know for a fact that the person who will take care of the tree is capable of caring for it.


My mother...lol do you know where this is going? My mother’s boss turned 60 this year. She wanted to give her boss a bonsai for her birthday. My mother swore that she would take care of it as her boss is notorious for killing plants. I said OK and gave her a good looking Chinese elm to present.  

Four months later my mom brought me this:


The amazing thing is that a new growth has popped out from the base of the tree. We’ll see where this goes.


Sunday, January 22, 2017

The most important bonsai article I have ever read.

I was reading Walter Pal's blog. He posted a link to one of the best articles about bonsai. I normally do not post links, but this is too important.

http://www.colinlewisbonsai.com/Reading/toomuchbonsai.html

Los Angeles' has two seasons, Spring and summer

It's been raining in los angeles about every week since Christmas. Let me tell you, I love it. It is going to be a great year for growing plants.


A special feature of los angeles is the amazingly warm winters. I was wondering when I could do some air layering. The recommendation for air layer is to do it when the sap starts to flow. They (who they are, i am not sure) also say that buds are a sign of a tree's sap flowing.

I was looking over the trees in my garden yesterday (january 19th) when I ran across this chinese elm i dug out of my front yard last year.

spring buds

I looked around some more and saw that one of my Japanese Green Maple also had buds on it. That's great because this tree is very tall and needs an air layer bad.


Spring bud

This saturday I am going to air layer like a madman. No plant will be safe. I'll  be cloning trees quicker than Star Wars episode two.

To top it off I will be experimenting with a secret weapon. A synthetic media. Yes I am going star trek up in here.
Im done with the movie references. Cheers.

Tuesday, January 17, 2017

Pomegranate, a tough tree for these tough times

Pomegranates make great bonsai. I highly recommend these for beginners. Pomegranates are vigorous trees. They love water and fertilizer. They are also drought tolerant (potted plants should always be watered at regular schedules). Pomegranate readily grows new branches after a pruning. A drawback to the pomegranate is that when a branch becomes lignified it become very brittle. That means that it prefers clip and grow instead of wiring.

primary branches

I have had this pomegranate for a year and a half. The first year I did not do much to it. The second year I trunk chopped it. You can see the scar in the picture. The trunk had an incredible taper. I wanted a broom style tree so I chopped off the top and left a thick branch on the side. You can see it under the scar. After that I let it grow.

primary branches

One day I was moving some pots when I noticed I had broken the new branches. The branches were green and soft. I would have to start all over. It worked out for the best as the newer branches grew in all the right spots as you can see from the picture.

I chose this tree because the trunk was thick, it had a very nice taper, and it was relatively inexpensive (you know me, I'm on a tight budget). The bark was nice and rough. Also, it had a dead surface root which I thought lent itself to nice jin.


It lost all of its leaves this winter. I know a lot of pomegranates keep their leaves. I was scared for a while that I had lost this tree. When I checked it this week I saw buds swelling and was much relieved. There are buds up and down the branches. This little tree is trying to work with me.


A note on pomegranate. I know people like to leave flowers and fruit on fruiting trees. As a rule, I cut flowers off as soon as they bud. Why? It takes energy to make flowers and fruit, and at this time I want to direct all the energy toward growth. Cheers.

Update 01/27/2017:

I found a pic from last summer.

Update 02/15:

The leaves have broken out. Happy days are here.


Thursday, January 12, 2017

uga, buga, Mugo (the european bush conifer)


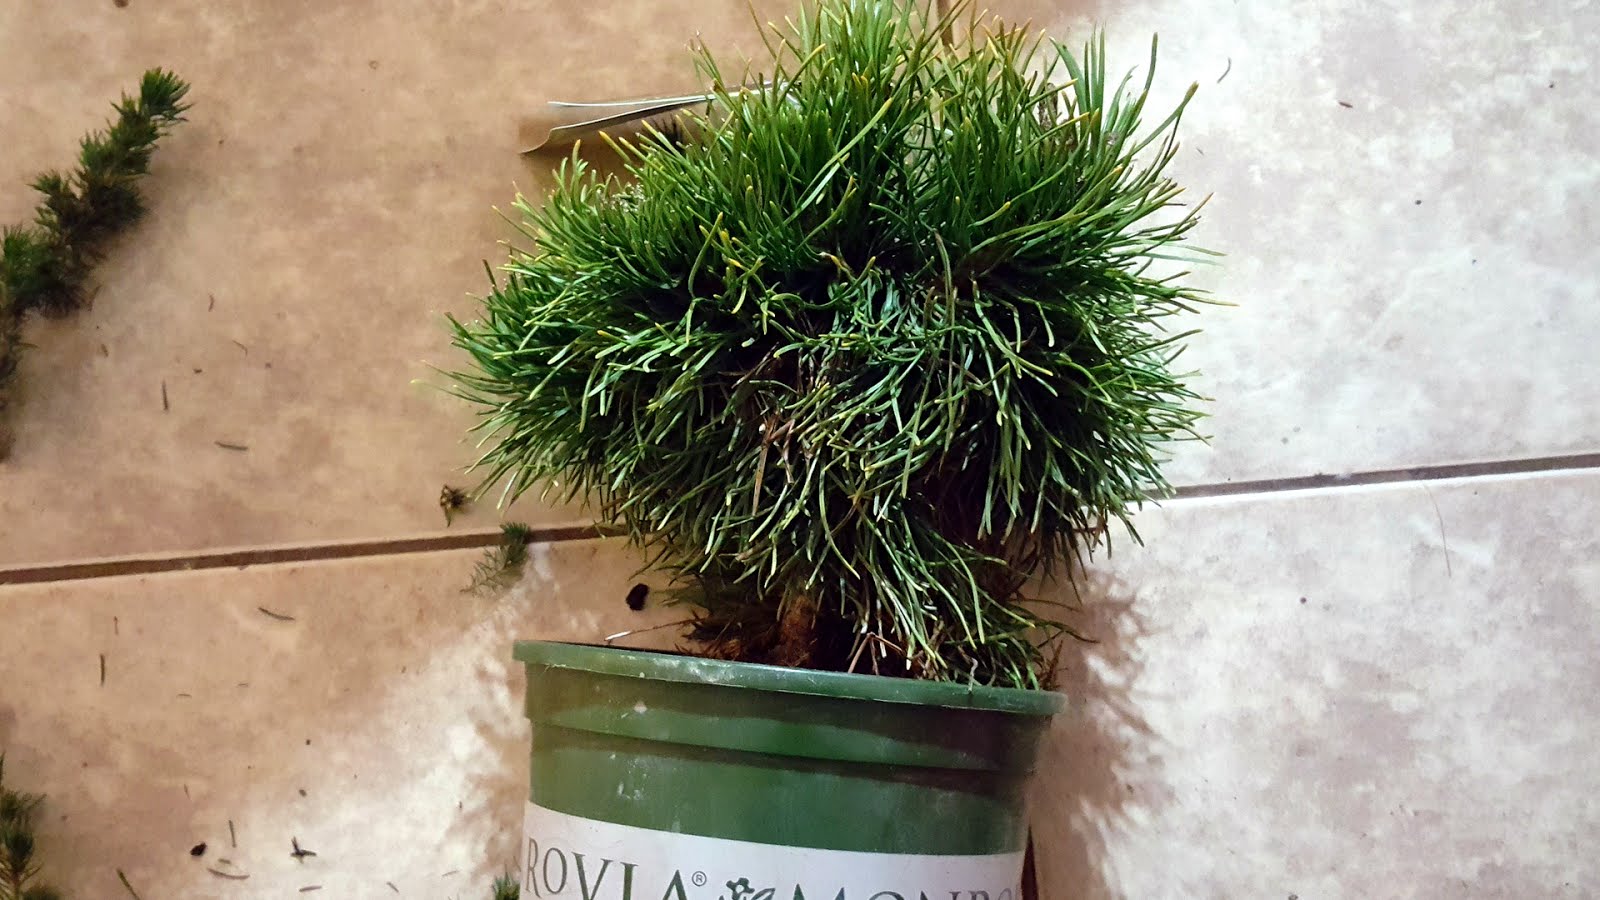
Winter is in full swing here in southern California. Where I live the Temperature has dropped below 50 degrees fahrenheit a few times over night. I know, t-shirt weather in many places around the world. I picked up a few conifers this week so that I could start working on something during our two and a half month long winter. I have not had much success with conifers in the past. It could be said that I have outright murdered them.  I have made some progress over the last year however, and now feel bold enough to attempt conifers again.

TI picked up a dwarf mugo that cost around $7.00 in U.S. I had bought one before that was much bigger. I found that the branches were very leggy. The legggy branches made it very difficult to work with.


For this tree I started at the easiest place to start. That would be the base of the trunk. The place where the trunk meets the soil. As a general rule there should be no branches there. I keep removing branches as i move up the tree until I feel satisfied with how the trunk looks. With all the foliage removed from the base I can see the tree in a better light. I can make better decisions regarding which branches stay and which branches “got ta go!”


I chopped off all the branches that grew straight down. After that, I chopped off the secondary branches on lateral primary branches. In other words i cut the branches growing up from main branches but not the ones in the tree apex. This thins out the tree quite a bit. It's amazing to see how drastically different a tree looks after each part of the pruning.


After that, I cut branches that are growing out of the same or near the same spot. Sometimes it's obvious which one to cut. Other times it doesn't matter.  You do have to get rid of one for aesthetics. I also cut some of the very small branches that give the tree needle volume but that are not very useful for composition. As a general rule i try to follow the concept of brackets like the kind they use for playoffs but backwards. I follow the main branch, that should split into two branches, those split off into two branches each etc. At this stage in the trees life it is not to important to remove all of the unnecessary branches. I did trim the top a bit to give it some shape.

Brackets like a perfect branch should look like


I still was not feeling right about the tree. so I chopped off the two lowest branches and then it came together in my head. I know some of you may not agree with the last two cuts I made, but I think that this is the foundations for a great bonsai. Did I cut too much? Let me know.


Saturday, January 7, 2017

A few inexpensive things to help with the bonsai budget

Bonsai can be a pretty expensive hobby if you want it to be. I don't have a lot of expendable income so I try to make it as inexpensive as possible. After all it all I do it for fun. I do however, want to present the bonsai  in the best light possible. I do not want my bonsai to look shabby or unkempt.

A store my brother introduced me to last year is Daiso Japan. This store has tools to art supplies, snacks, to slippers and everything inbetween


Outside

Inside

The base price for almost everything in the store is $1.50 U.S. There are things that are more expensive however, these are marked as such. The section that I visit the most is the gardening section. My favorite products from that section are as following:

These pots are about 6 inches wide. They are made from terracotta and have a glaze/ The two shapes that I have seen are rectangular and oval. They tend to be colored on the cool side. Are these pots show worthy? Of course not. Would I use these as training pots? Oh heck yeah. I use terracotta pots for many things. Bonsai terracotta pots are great for training pots. Or when you want to give a bonsai away but do not want to give up the pot now you have a solution.


You can get three sizes of aluminum wire for for the standard Daiso price. I did not notice that my picture was just of two sizes. The sizes are 1mm, 3mm, and i believe 5mm.  This is wire intended for use on plants. I have used it and found no difference to the stuff I buy at the bonsai nurseries. The only drawback is that sometimes it's in short supply.


I bought two different size sieves. A one for large particles and one for smaller ones to go through. These are good for sifting through hard soil materials to get the desired size for soil recipes.


This round beauty is the mesh that the japanese love to put in the holes in there pots. It is small and rigid. I find it easier to use than the softer white stuff. Also, Depending on the size of the pot I do not have to use wire to keep it in place.


They have an aisle with saki cups and teacups. These are very pretty and with a masonry bit can be transformed into pots. But that's a subject for a different post. Cheers.


Friday, December 2, 2016

Rosemary bush year end bonsai

bonsai christmas tree


Hello my fellow bonsaiphiles. This is the year end of an experiment that I have conducted with you.  I want to thank you for your comments and emails. I want to thank those who have posted on my blog (Luke, i'm still waiting). This Blog has been therapeutic for me. I have chosen this rosemary disguised as a christmas tree. I understand that people who celebrate christmas around the world are in the minority. However, This is the time when most christian feel an even more overwhelming desire for brotherly love toward all people. That is why I chose this tree at this moment.

Anywho, this rosemari I bought at one of my favorite nurseries. I t was a 2 ½ foot bush. Originally the tree had been growing like this:


Of course it did not have this shape. It was growing up, not to the side. I noticed the twin trunks. At first I was not sure if it would make suitable material. Every Time I looked at it it made me more and more excited.

At first, I tilted the pot and gave it its general outline.Then when it started to grow again I potted it in its current pot. A big problem I had was that all the roots where now on one side of the tree. It looked very awkward.


A few months later after roots had grown along all the soil I removed the tree and sawed off all the roots directly to the left of the trunk line (where the trunk meets the soil). Now I could place the tree in a better spot in the pot.

I spent seven months to get it to this point. It cost $8.00 U.S. and the pot is a used chinese one that I spent $5.00 U.S. on.

When I first started bonsai I had so much trouble seeing a possible bonsai in a bush. I didn't let that stop me though. I made lots of mistakes but I pressed forward. Am I a master? Heck no! I am having fun and learning. Maybe i'll tackle some pine trees next year?!?!?!? Cheers.